Simulation
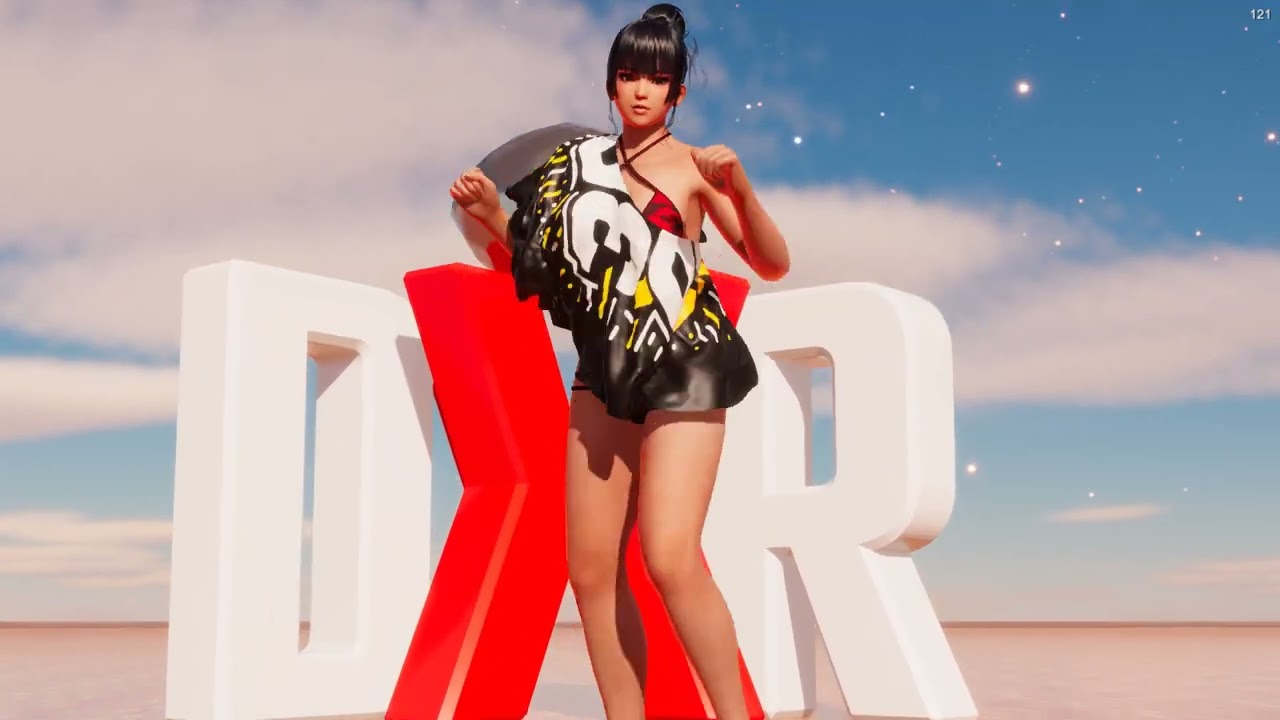
Generates and simulates clothing meshes on the actor model. Cloth simulation creates realistic clothing and fabric effects by simulating the movements of particles and constraints between them.
The key characteristics of the system are:
- Unconditionally stable: the simulation will always recover to a stable state no matter how extreme the conditions are.
- Multi-threaded execution: runs parallel in real-time on a separate thread alongside the animation system to utilize multi-core CPUs.
- Custom curved colliders: matches the curved body parts almost perfectly.
Supports two independent cloth layers with configurable topology, anchoring, materials, and fluid particle effects.
Performance Guide
The simulation prefers higher and stable frame rates. Our recommendation is to choose a suitable fixed frame rate in your ‘Display & UI’ settings, and select a comparable framerate in the ‘Compute’ settings for cloth simulation. The default settings set the simulation frame rate at fixed 90. If your system runs at 60 or 30, it should still work fine except for a slight slow-motion effect. You can increase the number of sub-steps to compensate for this.
Collider Adjustments
The cloth simulation system uses its own collider models and does not interact with standard physics components. The default settings are tuned on a XPS model and should work on most DOA models. For PMX, the body proportions vary a lot, so you may need to fine-tune the colliders to fit the model. First turn on visualization so you can see the colliders, then go to each of the sections to adjust the shape and sizes for body parts.
You can imagine the collider as 2 spheres on both ends with adjustable smooth curve that connect the spheres. You can adjust:
- The positions of the 2 spheres.
- The radius of the spheres separately.
- The value of the curve in-between (positive is convex and negative is concave).
Cloth Layers
Cloth 1 and Cloth 2 each define a separate garment with its own mesh topology, anchor points, and material. Use Rebuild Mesh to regenerate the geometry after changing shape parameters. Presets include skirts, tops, and string configurations.
Materials
Each cloth layer has a Material panel for surface shading, texture selection, and detail mapping. Supports transparent rendering and audio-reactive visualization modes.
Fluid Simulation
An experimental particle shower system that spawns fluid droplets with configurable spawn position, auto-aim, cohesion, and viscosity. See the Fluid sub-panel for detailed particle behavior settings.
Collision
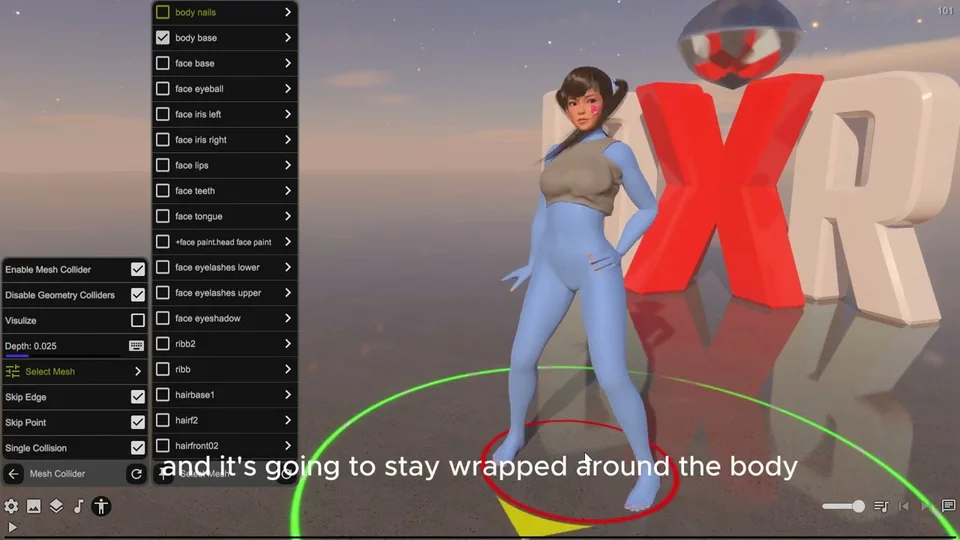
Geometry Colliders creates SDF body shapes for cloth to collide against. Mesh Collider generates tetrahedral colliders from the actor’s skinned mesh for more accurate collision with arbitrary geometry.
Settings reference
Cloth layer settings (Cloth 1)
Configures a procedurally generated cloth mesh. Topology selects the particle grid layout — Adaptive Hexagon, Adaptive Rectangle, Horizontal/Vertical Layout, or String variants. Inner Radius sets the waist opening size. Slope controls flare angle (0 = tube, 90 = flat disc). Arc shapes the profile — positive for balloon, negative for bell shape. Length sets garment length.
For horizontal layouts, Arm Holes and Arm Hole Height carve openings. For vertical layouts, Back Length and Side Length scale the mesh independently, and Split Interval creates gaps in the mesh. Horizontal and Vertical Resolution set particle spacing. Distance Compliance controls stretchiness. Damping reduces oscillation. UV Mapping selects texture projection mode. Particle Radius sets collision size.
Cloth anchors (Anchor)
Configures how the cloth mesh attaches to the actor’s skeleton. Top Anchor and Bottom Anchor define the upper and lower attachment points using bone-relative positions and rotations. The cloth spans between these two anchor rings, with attraction strength controlling how tightly particles follow the anchor bones during simulation.
Particle Properties
Sets the shared forces and collision behavior for particle simulation. Gravity controls downward acceleration; Drag (Air) and Drag (Underwater) slow movement, while Buoyancy affects submerged particles. Wind tunes how global wind and turbulence influence the particles. Friction controls sliding at contact, and collision-layer selection determines which objects interact. Keep the default values while selecting and anchoring a mesh, then change one parameter at a time to tune its response.
Cloth material settings (C1 Material)
Configures the surface appearance of a cloth mesh. Supports solid color textures, detail maps, and transparent rendering. Audio Visualization mode replaces surface settings with reactive frequency/beat patterns that animate the material properties in real-time.
Surface controls roughness and metalness. Texture selects from ground pattern presets or solid color. Detail Map adds secondary surface noise. Transparent enables alpha blending for see-through garments.
Toon shading (Toon Shader)
Overrides the actor’s material with a global toon shader.
Enable the toggle to replace all materials with a unified toon style. Adjust Shading and Shadow for the light/dark balance, Outline for edge thickness, and Ambient for the fill light level.
Highlight Area and Soft Highlight control how sharp the bright areas are. Shadow Area and Soft Shadow do the same for dark areas.
Specular and Soft Specular add shiny reflections to lit surfaces.
Receive Shadow (non-HDRP only) lets the material receive shadows from other objects.
Special shader (Special Shader)
Overrides the shader type for all materials on the actor.
Mode selects the shader: Off uses the default shader; Refraction Thick/Thin simulates glass with refractive transparency; Outline renders only the outline edges; Unlit disables all lighting; Experiment is a placeholder for custom shader effects.
Refraction controls the index of refraction for glass modes — higher values bend light more.
Thickness adjusts the perceived depth of thin glass refraction.
Audio Visualization
Holds the ring visualization layout, colors, textures, and audio-reactive settings.
Color and glow (Ring Color)
Holds a base color and glow intensity for audio-reactive elements. Glow is multiplied with the color and animates with the beat when auto-update is enabled.
Background Color
See Color and glow. Defaults and available controls for this instance are listed in Config Reference.
Foreground Color
See Color and glow. Defaults and available controls for this instance are listed in Config Reference.
Hexagon Map
A procedural hexagonal (or circular) micro-pattern overlaid on the surface for fishnet, sci-fi panel, or studded looks. Toggle it off whenever you want a smooth fabric.
Density & Shape
Density sets how many hexagons fit across the surface (snapped to powers of two for clean tiling). Size scales each hex within its cell — smaller values leave gaps between hexes, larger values pack them tight. Use Circle swaps the hex shape for circles, useful for polka-dot or rivet looks. Soft Edge controls the falloff at each cell’s border; values near zero give a crisp boundary, larger values blur the pattern into the surrounding surface.
Bump & Noise
Bump raises or lowers each cell relative to the surface (negative values stamp inwards). Noise randomises per-cell height so the pattern doesn’t read as a perfect grid.
UV Projection
For outfits the cells can either follow the model’s UV layout or be projected from a virtual cylinder around the body. UV Projection enables the cylindrical mode — turn it on when stretched or distorted UVs ruin the pattern. Projection Radius scales the cylinder, and Rotation tilts it so the hex grid runs diagonally instead of straight.
Cloth 2
See Cloth layer settings. Defaults and available controls for this instance are listed in Config Reference.
C2 Material
See Cloth material settings. Defaults and available controls for this instance are listed in Config Reference.
Fluid (Experimental)
An experimental particle-based fluid simulation system. Spawns up to 1000 particles with configurable physics including cohesion, viscosity, gravity, and surface interaction. Particles can render as points or as scaled droplets with PBR material properties.
Spawn
Controls particle generation — fixed position, hand/mouse aiming, or auto-tracking. Configure rate, speed, spread, and lifetime.
Fluid
Defines particle interaction physics: cohesion strength, viscosity, stickiness, and target spacing. Presets include water, viscous fluid, and sand-like granular behavior.
Render
Toggles point cloud vs droplet mesh rendering. Droplet size can scale with local fluid density. Material properties include color, metallic, smoothness, glow, and transparency.
Spawn
Configures where and how fluid particles are generated. Supports three spawn modes: fixed position relative to the actor, VR/mouse hand control, and auto-aim tracking.
Position and Rotation set the fixed spawn point. Spawn Radius and Spread control particle dispersion. Spawn Rate sets particles per second. Speed controls initial velocity. Max TTL is the particle lifetime before respawn. TTL on Floor is how long puddles persist. Smoothing damps the auto-aim target tracking.
Fluid
Defines particle interaction physics.
Particle Size is the rest distance between neighbouring particles in mm — the fundamental size knob. It drives the rest density target, the body-collision radius, and (via Kernel Ratio) the SPH kernel reach. Kernel Ratio is the SPH kernel radius as a multiple of Particle Size. The standard PBF value is 2.0 — raise it for a smoother / slower fluid, lower it for a sharper / less stable one.
Cohesion pulls particles together into streams. Viscosity resists flow for thicker fluids. Target Density scales how dense the fluid wants to be at rest. Lower (< 1) = more compressible / weaker push-apart on spawn. Higher (> 1) = stiffer fluid. Pressure Softness regularizes the per-particle pressure correction — higher values dampen the violent push-apart that happens when newly-spawned particles overlap. The right knob to turn first if particles bounce away from each other on spawn.
Presets: Water (light, cohesive), Viscous (thick, sticky), Sand (no cohesion, granular).
Ray March Surface
Raymarched fluid surface — a smooth metaball isosurface lit and refracted through the camera’s opaque scene. Requires the Fluid Raymarch Custom Pass Volume to be present in the scene (injection point: Before Transparent).
Experimental, and HD only. These settings are global: the surface is drawn from one shared GPU buffer, so every actor’s fluid renders with the values set here and with the kernel radius of whichever fluid is built first. Per-actor surface settings are not supported.
Render Surface enables the pass at runtime. Color is the bulk fluid tint; alpha controls how much it mixes with the refracted scene behind it (alpha=0 → clear, alpha=1 → opaque tint). Specular Power / Strength size and brightness of the highlight. Fresnel Power how tightly the rim hugs glancing angles (lower = wider rim). Fresnel Strength how much rim there is at all (0 = none). Specular and fresnel are added on top of the body colour, so they keep their full brightness however transparent Opacity makes the fluid. Refraction screen-space displacement of the scene behind the fluid.
Geometry Collider
Defines SDF (signed distance field) body capsule shapes that cloth and physics systems collide against. Each body part (head, neck, chest, ribs, waist, belly, butts, arms, legs, etc.) is a configurable capsule with position, radius, and curve parameters.
Shapes scale with actor morphs to maintain proper collision geometry across body types. Visible toggle shows collider wireframes in the scene. Organized into sections: head, body, arms, and legs. NSFW builds include additional hole collider configurations.
Mesh Collider
Generates tetrahedral collision geometry from the actor’s skinned mesh renderers. Unlike SDF capsule colliders, mesh colliders conform to arbitrary model geometry for accurate collision with custom clothing, accessories, or props.
Select individual meshes to enable as colliders. Each mesh has an Exclusion panel to disable specific bones from contributing collision surfaces. Depth controls the offset thickness of the collision shell. Visualize renders the generated collider mesh in the scene.