Creator Edition
Creator edition offers offline render capabilities, which allow you to record videos without worrying about your actual frame rate and screen resolution. For example, you can record 4K video smoothly at 60fps even when your monitor is 1080p and your computer is not able to maintain that framerate. It can also generate 3D and VR 180 videos.
Recording menu
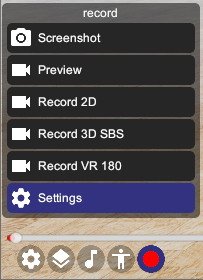
To access the recording features, click on the red circle “recording” button on the main UI. Then select one of the options in the recording menu to either start the recording process or change recording settings.
When you have a VMD motion with audio loaded, the recording will last for the duration of the whole song. Otherwise the default recording duration from within the recording settings will be used.
You can use the preview option to preview the recording on screen. The output will only be renderred on screen and no image will be saved. Use this to make sure your camera and motion selection are correct.
During recording or preview, the number of the currently frame and total frames of the recording are displayed on screen, and an estimated time is calculated to indicate how long it will take to generate the entire recording. You can use the “Terminate” button below to end the process at any time.
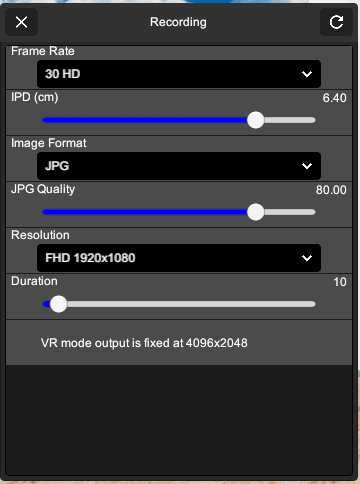
From the recording settings, you can also change the framerate, image format and compression quality.
Recording modes
You can choose from 2D, 3D SBS and VR 180 recording modes when starting recording from the menu.
With 3D SBS, 2 cameras are used to generate the output, one for each eye. The images are placed side by side.
With VR 180, please note that this doesn’t provide true 180 degrees field of view. Instead each camera renders at 120 degrees and the outside area is filled with black. This is a compromise for efficiency for now. We’ll evaluate options to provide full 180 and 360 field of view VR videos in future updates.
2D and 3D SBS modes use the selected resolution in the settings whereas VR180 output is fixed at 4096x2048, that is 2048x2048 each eye.
Post processing
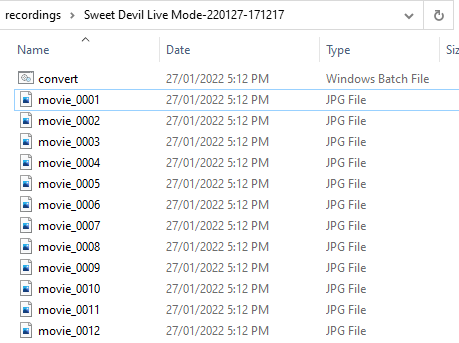
The output of the recording are stored as sequence of images due to a technical limitation at the moment.
You’ll need to use tools like ffmpeg to convert the images into a video. (If you are familar with video editing, you can use whichever tool that you prefer. FFMPEG is only recommended here due to its ease of use)
Here is an article about how to install ffmpeg on Windows: https://www.wikihow.com/Install-FFmpeg-on-Windows
Once you have ffmpeg installed and its path added to environment variables, you should be good to go.
In the folder that contains the output images, there is also a batch file that will perform the conversion if you have ffmpeg on your system.
You can also do it manually type the command in a terminal window if you wish to fine tune the parameters.
The basic conversion command will look like this:
ffmpeg -r 30 -i movie_%04d.jpg -i sound.wav movie.mp4
What this does is it takes movie_####.jpg and sound.wav as input, generate a video at 30 fps, and save the output to movie.mp4
“-r 30” is the framerate of your video, if your setting is 60 fps, use “-r 60” instead.
“-i movie_%04d.jpg” is the pattern of the input image files, if your image format is not “jpg”, use the correct extension instead.
“-i sound.wav” is the path to audio file. You can skip this part if you don’t need audio in your video.
“movie.mp4” is the output filename, you can choose whatever you want.
For 2D videos, that is all you need.
For 3D SBS videos, you’ll need to add additional parameters to set the correct metadata:
ffmpeg -r 30 -i movie_%03d.jpg -vcodec libx264 -x264opts "frame-packing=3" movie.mp4
For VR180 videos, you’ll need another tool to set the correct tag so the video can be recognised correctly on platforms like Youtube. “VR180 Creator” from Google is the recommended tool for this step.
For some reason VR180 creator is no longer available from Google website, but you can still find it here: https://www.patrickgrunwald.de/vr180-creator-download
Steps tp tag your video as VR180 content
- Open “VR180 Creator”
- Select “Prepare for publishing”
- Drag the video file from the previous step to the big box
- Make sure “Left/Right” is the selected sterero layout, and “180 video” is the selected input field of view.
- Click on export and you are all done!
Latest updates
1.4.3
-
Proper support for VR180 format with full 180 horizontal field of view. Previously VR180 are renderred at 120 degrees.
-
Support for VR360 video is also added. (2D only ATM)